
Vintage Vanity Styles That Define the Era
The 1940s Hollywood Glamour Look
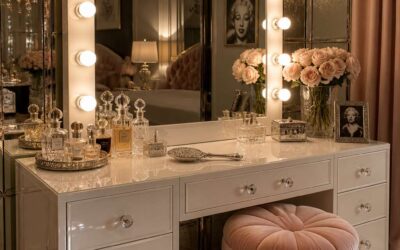
A curved silhouette with a triple mirror defined 1940s Hollywood glamour. This decade brought silver screens into British bedrooms, and the vanity became a stage for personal reinvention. Manufacturers used rosewood and walnut veneers, often adding fluted legs and soft scalloped edges to echo Art Deco sensibilities. These retro dressing tables were not merely furniture; they were framed as cinematic props for daily life.
Your eye should catch the details that made the era distinctive:
- Glossy lacquer finishes with champagne or ivory tones
- Vanity mirrors with side wings and clouded glass
- Upholstered bench seats in velvet or faux leather
- Integrated jewellery trays and glass perfume shelves
Many pieces featured discreet lighting, a practical nod to wartime blackout rules. That fusion of function and fantasy remains why these retro dressing tables still anchor vintage themed interiors across the UK.
Mid-Century Scandinavian Simplicity
By the 1950s, British bedrooms had swapped the starlet’s stage for the architect’s blueprint. Mid-Century Scandinavian simplicity swept aside the ornate curves of the previous decade, favouring clean lines and honest materials. The obsession with Hollywood fantasy gave way to a quieter, more cerebral form of domestic elegance. What strikes me most is how this shift changed the very purpose of the furniture. These were not props for performance, but calm, functional objects designed for everyday ritual.
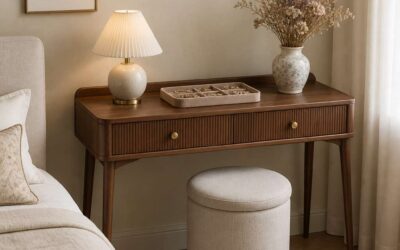
The Scandinavian approach prized light woods and uncluttered forms. Teak, rosewood, and oak replaced glossy lacquers, their natural grain left exposed. Designers stripped away the fluted legs and scalloped edges, leaving behind slim, tapered frames and geometric silhouettes. The visual language became one of restraint. A retro dressing table from this era often featured a floating top, creating an airy feel that defied the bulk of traditional bedroom furniture.
– Undressed teak and oak surfaces with visible wood grain
– Slim, tapered legs inspired by Danish furniture design
– Simple, asymmetric drawers with integrated finger pulls
– Minimalist wall mirrors instead of bulky vanity sets
These pieces offered a different relationship with the user. There was no theatre here, no cushioned bench or integrated lighting. Instead, the focus moved to storage and practicality. The jewellery trays remained, but they sat inside deftly engineered drawers with soft-close mechanisms that felt modern even by today’s standards. The perfume shelves disappeared, replaced by clear expanses of surface for a single lamp or a small tray. This was a deliberate move away from the dressing table as a display of vanity and towards a more private, efficient morning routine. For collectors, the appeal of these retro dressing tables lies in their quiet confidence, a testament to a period when less truly became more.
The Bold 1960s and 1970s Expressions
The 1960s and 1970s abandoned restraint. British bedrooms embraced colour, geometry, and a boldness that rejected the quiet calm of the previous decade. Retro dressing tables from this period became statement pieces, often finished in vibrant lacquers or wrapped in bold veneers.
Designers experimented with shapes and materials. Chrome, smoked glass, and Perspex appeared alongside traditional woods. The forms were angular, sometimes even brutal. A dressing table might feature a kidney-shaped top or cantilevered drawers that seemed to float without support.
Defining features included:
– High-gloss finishes in burnt orange, olive green, and mustard
– Space-age materials like chrome and acrylic
– Asymmetric silhouettes with dramatic, sculptural legs
The vanity returned as a visual centrepiece with a playful, almost futuristic energy! It was less about quiet morning rituals and more about making a declaration. I find this period fascinating because retro dressing tables captured a moment when furniture became a form of self-expression.
How to Identify Your Favorite Decade
The mirror’s shape is the fastest clue to a decade’s identity. A sleek, rounded mirror with a backlit frame points to the 1950s, while a sharp, geometric silhouette signals the 1960s. For retro dressing tables, the hardware reveals just as much: brass knobs suggest pre-war craftsmanship, whereas abs plastic pulls scream mid-century.
If you are hunting for a specific era, inspect the joints and the finish. Dovetail joints on drawers often indicate hand-built furniture from the 1930s. Veneers that are book-matched or bird’s-eye maple are typical of the 1940s. Knowing these markers helps you distinguish genuine period pieces from later reproductions. I always check the underside for manufacturer stamps, which were common on British-made retro dressing tables until the late 1970s.
- Tapered legs with brass ferrules for the 1930s
- Angled, splayed legs for the 1960s
- Straight, blocky frames for the 1970s
This tactile approach turns a simple purchase into a historical investigation.
Choosing the Right Antique Vanity for Your Bedroom
Assessing Available Space and Layout
The average UK bedroom spans just 12 square metres, so every piece of furniture must earn its floor space. When I evaluate retro dressing tables, I measure the alcove first, not the showroom floor. A 90 cm wide vanity can look modest in a warehouse yet overwhelm a compact room.
Start by mapping the room’s natural circulation. Keep a clear route from door to wardrobe, and position the mirror to catch daylight from a side window. You will need less artificial lighting, and the angle flatters a morning routine. Also, respect your radiator; a table pulled tight against the heat can warp a vintage veneer over time.
Matching Wood Tones to Existing Furniture
The warmest room in your house feels disjointed when a mahogany dressing table sits beside pale ash. Matching wood tones requires reading undertones, not finishes. Hold your bedside cabinet next to the vanity in daylight and look for the base colour: honey, chestnut, or a greyed oak.
- Teak: golden brown, pronounced grain
- Rosewood: deep red to purple
- Walnut: chocolate, sometimes greyed
- Oak: pale honey, often stripped
Retro dressing tables use teak or rosewood, which carry golden or red undertones that clash with pine floors. If your room leans toward dark walnut, choose a restored 1950s unit with a similar patina. Use a wood shaving against a neutral grey card, and the true hue becomes obvious! When I shop for retro dressing tables, I look for at least one shared accent, like a brass handle, even if the wood differs.
Mirror Types: Framed, Triptych, or Floating
In the trade, a cloudy mirror is called silvering failure, affecting many pre-1960 vanities. The mirror type changes the look and function of retro dressing tables. A floating mirror sits flush against the backboard, saving depth in tight bedrooms. A framed mirror, often bevelled, adds a formal line and pairs well with patterned wallpaper. Triptych mirrors use three hinged panels, letting you check your profile while styling your hair. The side wings on retro dressing tables pivot, so test hinge tension before committing.
- Hinge stiffness on triptych wings
- Dark spots in the silvered backing
- Fixing points on framed mirrors
Replacement glass is straightforward to source, but keep the original frame if intact. A triptych arrangement gives the most flexibility, yet it carries more visual weight. In a narrow room, a floating mirror keeps the silhouette clean. Framed mirrors often conceal their wall fixings, which matters when positioning the vanity away from a wall.
Drawer Configurations and Storage Needs
A 1930s dresser vanity might conceal a glove box inside its central door, while a 1960s piece often spreads storage across three shallow drawers. The layouts vary far more than people expect, and matching the drawer configuration to your actual routine matters most.
Consider vertical space. A row of shallow top drawers suits jewellery and small cosmetics. Deeper lower drawers hold hair dryers and styling tools. Some retro dressing tables include a removable tray liner for easier cleaning.
- Single wide drawer with a central cut-out for mirror access
- Three smaller drawers with divided compartments
- Two side cabinets with a drop-down flap
Check the runner mechanism on retro dressing tables you consider. Original wooden runners are smooth but often worn, while metal extensions give a modern glide. If the carcass shows signs of forced repairs, walk away! A well fitted design will serve you better than a modified one.
Setting a Realistic Budget
Auction records show untouched retro dressing tables with original finishes sell for a third more than restored pieces. That premium matters when you set your ceiling. Knowing the difference between a clean example and a polished one keeps your budget honest.
Proportion is the first thing I check. A six-foot vanity with a high back will overpower a Victorian terraced bedroom. Measure the wall, then measure the piece’s footprint! Include delivery, lifting, and any electrical work in the budget.
- Original glass with silvering loss is cheaper to replace than you think
- Replacement castors or feet are usually easy to source
- A cracked veneer is a negotiation point, not a dealbreaker
For retro dressing tables, a realistic budget separates the piece from its repairs. Pay for solid construction and honest patina. Leave room for a professional re-polish or new runners. The right vanity fits your room and your wallet.
Restoration and Refinishing Projects Made Simple
Essential Tools for Furniture Restoration
Restoring a retro dressing table can feel like a surgical procedure, but the right instruments change everything. In my experience, most mid-century pieces need structural attention before any polish. The veneer is often lifting, and drawer joints may be loose.
Essential tools for furniture restoration are straightforward if you know where to invest. I always keep these on hand:
- A cabinet scraper for removing old finish without harsh chemicals
- Hide glue and a syringe for reattaching loose veneer
- Fine-grade abrasive pads for working between coats
- Brass brushes for cleaning hardware without scratching
For retro dressing tables, patience with these basics avoids costly repairs. The real trick lies in matching the original stain, not painting over the character. Take time to test on hidden spots. That warm patina, once lost, cannot be fully recreated. So proceed gently, and your efforts will reward you.
Safely Removing Layers of Old Paint
Over half of UK homes built before 1960 contain lead paint, and an old dressing table often carries that legacy. Stripping it safely determines everything that follows.
I prefer a slow-acting chemical stripper for retro dressing tables with veneer. Heat guns can delaminate the surface in seconds. Apply the stripper with a brush, give it time to soften every layer, then scrape with a plastic tool. Work in small patches, not whole panels.
For turned legs, use a brass brush to coax paint from the beading. Avoid sanding between coats; it pushes pigment into the grain. The finish you salvage depends on how gently you lift each layer.
Choosing the Right Wood Stain or Dye
Once the old finish is gone, the bare wood shows its history. Some panels carry sun fading, others hold pale water rings. This is where stain and dye diverge.
Dye penetrates deep into the grain, shifting the timber’s natural colour while leaving the structure visible. Stain sits nearer the surface, depositing pigment that evens out scratches and patchy veneer. For retro dressing tables with oak or teak veneers, gel stain often proves steadier than thin liquid alternatives. I reserve dye for bare sanded oak and use oil stain when the veneer has already been refinished once.
The practical differences matter here:
- Water-based dye, colourfast and light-resistant, suited to fresh timber
- Oil stain, forgiving on raw wood but prone to blotching on glued veneer
- Gel stain, thick enough to hide filler without obscuring the grain
Choosing wrongly means streaking that no lacquer will fix.
Replacing Hardware Without Losing Character
Roughly ninety percent of vintage dressing table casualties come from mismatched hardware, not damaged timber. I have lost count of lovely pieces ruined by a careless knob swap. When restoring retro dressing tables, I treat every screw hole as a historical record.
Original fittings carry maker’s marks and spacing patterns that modern replacements ignore. British pieces from the 1950s typically use 3.5 inch centres; continental imports differ. Measure the pitch before removing anything.
- Photograph the original handle arrangement
- Bag each screw with its matching bracket
- Check the base material, brass, chrome, or Bakelite
If the originals are intact, polish gently and reattach. If they are beyond saving, the replacement must match the original footprint to preserve the piece’s character.
Re-gluing Joints and Stabilizing Legs
Rattling joints and wobbly legs are the most common ailments found in retro dressing tables. The culprit is usually dried-out animal glue, which loses its grip after decades of central heating. If a leg twists in its socket, do not wait for a complete failure. A simple regluing job, tackled early, prevents far more serious damage to the surrounding timber.
The first task is a full joint inspection. Before applying any adhesive, you need to understand how the piece was constructed initially. Many British manufacturers used dowel joints for legs, while others used mortise and tenon. These need different approaches.
Here is a useful sequence for your initial assessment:
– Check every corner joint for lateral movement
– Identify loose drawer runner joints
– Look for hairline cracks radiating from screw holes
– Mark any leg that swivels independently of its fixing block
Once you have identified the problem areas, the re-gluing process becomes straightforward. Use a high-quality PVA wood adhesive for general joint work. For tighter gaps, inject the glue and clamp the joint solid. Old hide glue can be reactivated with careful heat application from a heat gun, which allows you to separate and clean the joint without damage.
Stabilising legs follows the same logic. A wobbly leg often stems from a stripped screw in the fixing plate. Pack the hole with wooden toothpicks dipped in glue before reinserting the screw. Do not overtighten, this only strips the thread again. If the leg has a loose dowel, tap it out, clean the socket, apply fresh adhesive, and reset it with a rubber mallet. The goal is to return the piece to a solid state, preserving its original character. A well-restored base gives you confidence when you lean over to apply your makeup. These repair skills are fundamental for anyone serious about collecting retro dressing tables.
Styling Ideas for a Picture-Perfect Vanity Area
Creating a Mid-Century Decor Vibe
Mid-century style flatters a vanity when every object has a purpose. A sculptural table lamp with a brass stem casts a warm, focused glow without overwhelming the surface. Add a ceramic bowl for rings and a small stack of hardcover books with muted spines.
For a cohesive look, rotate these elements:
- A textured linen runner in rust or olive
- A low, wide planter with a trailing pothos
- A framed abstract print leaning against the mirror
Retro dressing tables gain character when you keep the arrangements asymmetrical. Offset the lamp with a single glass perfume bottle on the opposite side. The mid-century vibe thrives on negative space, so resist crowding the surface.
Glass Perfume Bottles and Powder Jars
Most retro dressing tables carry a patina of their own, but the objects you place on them decide the mood. Glass perfume bottles and powder jars are the quiet stars of a picture-perfect vanity area.
Choose bottles with faceted stoppers or hand-painted labels. Group three together, varying heights. Add a powder jar with a silver lid to catch the light.
- Use a mirrored tray to corral smaller items
- Pair a cobalt blue bottle with an amber jar
Retro dressing tables invite this kind of layered styling. The arrangement reads as deliberate without feeling staged. When the morning light hits the glass, the whole room gains a subtle glow.
Incorporating Plants and Artwork
A vanity without greenery reads incomplete, no matter how many antique brushes sit on it. Plants and artwork complete the scene, though they often get overlooked. A single trailing philodendron or a compact fern softens the angular lines of retro dressing tables. Place the plant off to one side, away from direct sunlight and makeup spills. For artwork, choose a single framed print or a small gallery wall above the mirror. Botanical illustrations and abstract line drawings work well with period pieces.
A few styling details I favour:
- Use a ceramic pot with a contrasting glaze.
- Let the plant’s leaves drape over the edge.
- Match the frame’s metal to the existing hardware.
The goal is balance. A plant brings organic texture, artwork adds a focal point. These retro dressing tables look best when every element earns its place, no clutter, no randomness.
Layering Lighting from Soft to Bright
The difference between a functional vanity and a picture-perfect one often comes down to light. A single overhead bulb casts harsh shadows across the mirror, while layered lighting creates depth and flatters both the user and the furniture. For retro dressing tables, this means combining ambient, task, and accent sources without turning the space into a showroom.
Start with a soft ambient source, like a dimmable wall sconce or a small ceiling pendant. Then add task lighting at eye level, ideally a pair of vintage lamps with fabric shades. Finally, introduce accent light behind the mirror or beneath the table. This sequence gives you control from a gentle morning glow to bright evening prep, and it is surprisingly simple to achieve.
- Use warm bulbs around 2700K for the ambient layer
- Select adjustable task lights for concentrated mirror work
- Install a dimmer switch to transition between moods
Retro dressing tables respond well to this graduated approach. The wood tones and mirror details gain richness under different intensities, and the whole corner feels intentional rather than either harsh or murky. These retro dressing tables deserve lighting that matches their character.
Sourcing Authentic Period Pieces Like a Pro
Best Times to Shop Estate Sales
Estate sales in the UK often price items to sell by Sunday afternoon, but the most desirable pieces usually go in the first hour. For anyone hunting retro dressing tables, that opening window is where the authentic items surface. Sellers frequently place newer furniture in prominent rooms, while period pieces end up in spare bedrooms or the garage, waiting for someone to look past the clutter.
Best times to shop estate sales:
– Friday opening: first pick of veneer condition and original hardware
– Saturday midday: sellers may drop prices if they want fewer items to move
– Sunday late: steep reductions, though mostly on damaged or heavily restored pieces
Bring a torch and a flexible tape measure to inspect drawer joints without forcing anything. Estate agents rarely photograph the backs or undersides of furniture, so attending in person reveals what the listing omits.
Pros and Cons of Online Auction Sites
Online auction sites have transformed how collectors source retro dressing tables. You can bid on a Danish teak piece from Cornwall while sitting in London. The pros include a national inventory and transparent bidding histories. The cons are tangible. Product photos rarely show drawer runners or the underside where woodworm lingers. Sellers often measure only obvious dimensions, so delivery quotes arrive as a shock. One dealer admitted shipping exceeded the hammer price.
Seller experience ranges from specialists to house clearers. Specialists describe flaws accurately. Clearers often guess at dates. I once won a piece that looked pristine, then found a replaced leg. Estate sales allow hands on inspection, but online auctions open access to retro dressing tables you would never see locally.
The trade-offs are straightforward:
- Wider selection across regions
- No physical contact before bidding
- Variable seller accountability
Auction returns rarely cover misdescribed furniture, so scrutiny becomes your only protection.
Reproductions Worth Your Money
Authenticity reveals itself in the joinery. Dovetail joints on a genuine 1960s piece show slight irregularity, while modern reproductions stamp out machine-perfect corners. Check the drawer base. Original retro dressing tables often use oak or elm there, never plywood. Look for these markers:
- Lift the piece at one corner to test racking
- Run a fingernail across the veneer to detect delamination
- Inspect the back panel for original nails versus replacement screws
Reproductions worth your money share certain traits. Kiln-dried hardwood frames and solid drawer construction matter more than the styling. A well-made copy with quality materials can outperform a damaged original needing extensive restoration. The veneer tells the difference. Genuine teak or rosewood carries depth and grain variation, while printed patterns appear flat under raking light. One dealer I trust calls this the fingernail test, and it never fails. When sourcing retro dressing tables, this distinction is everything.
Inspecting for Woodworm or Warping
Woodworm damage shows up as tiny flight holes, usually clustered around the joints and feet of retro dressing tables. Fresh frass, which resembles fine sawdust, signals an active infestation. Warping reveals itself when the mirror frame sits unevenly against the wall or when drawers stick despite proper alignment.
I once inspected a Danish teak piece that looked flawless from the front. The back panel told a different story. A gentle press with a thumb revealed soft spots where beetle larvae had tunnelled through the veneer. The seller had concealed it with dark varnish.
Check these zones on any vintage find:
- The underside of the top surface and the plinth
- Behind the mirror glass where humidity gathers
- The inner faces of drawer fronts near the handles
Warped tops on retro dressing tables often come from decades of damp cloths and standing water. Lay a straightedge across the surface. A gap beyond a few millimetres means the substrate has swollen or the veneer is lifting.
Negotiating Prices with Sellers
In the UK, a 1960s G Plan piece can sell for a quarter of its original price at a provincial auction house, while London design shops ask triple for retro dressing tables. Provenance matters. Ask for the maker’s stamp, the model number, or the original receipt. These details separate a true period piece from a clever reproduction.
Negotiating with private sellers is a quiet art. I bring cash, many older collectors prefer it. Point out worn runners or missing keys without theatrics. A calm observation about the cost of rechroming handles often lowers the asking price. Provenance gives you grounds for a fair offer.
Dealers in retro dressing tables expect a discount for cash purchases and immediate collection. Most sellers accept 10 to 15 percent below the sticker price. Those who decline often include delivery in the deal instead.
Long-Term Care and Preservation Tips
Daily Dusting Habits That Save Finishes
Over 60% of finish damage on retro dressing tables stems from dust abrasion, not age. Dust particles act like fine sandpaper when wiped dry, so the habit matters more than the tool. I use a slightly damp microfibre cloth, then buff with a dry one. This lifts grime without scratching the lacquer.
For intricate carvings or bevelled mirror edges, a soft cosmetic brush reaches crevices that cloths miss. Work top to bottom, and never apply polish directly to the surface. Spray onto the cloth instead, as excess moisture dulls veneer over time.
- Dust weekly, not daily, to avoid over-handling fragile joints.
- Keep retro dressing tables away from radiators and south-facing windows.
- Use felt pads under ornaments to prevent surface rings.
Consistent, gentle routines preserve the patina that makes these pieces valuable. Skipping weeks allows grime to bond, which leads to harsher cleaning later.
Conditioning Wood with Natural Oils
Conditioning wood on retro dressing tables requires patience. Most people overlook the difference between feeding a veneer and simply glossing over it! Unlike quick polish sprays, natural oils penetrate the grain and replenish the lignin that dries out over decades. I prefer tung oil or raw linseed, thinned with citrus solvent. These harden inside the wood rather than sitting on top like a film.
Apply the oil with a lint-free cloth in circular motions. Let it soak for twenty minutes, then wipe away the excess. A second coat after eight hours yields a deeper satin sheen. Avoid olive or vegetable oils; they stay tacky and attract dust.
- Check the existing finish before oiling
- Test on an underside corner first
- Buff with a soft cloth after each coat
This monthly ritual keeps the veneer supple for retro dressing tables, especially during dry British winters.
Protecting Mirrors from Tarnish and Fog
Mirror silvering fails silently. Humidity is the primary culprit, and retro dressing tables often sit against damp exterior walls where temperature swings create condensation. That fog you wipe away is moisture working behind the glass, attacking the silver backing. Tarnish appears as dark edges or cloudy patches that no cleaner will remove.
- Steam from baths or kettles
- Ammonia cleaners that seep past edges
- Rapid temperature shifts near radiators
Silica gel sachets placed inside drawers or behind the mirror frame absorb ambient moisture. Soft microfiber cloths with plain water are safer for these mirrors than polish sprays. Early tarnish often prompts owners to replace the whole mirror, but a glazier can re-silver the backing while preserving the original frame and glass.
Preventing Tilting Accidents on Uneven Floors
Uneven floorboards in Victorian and Edwardian homes cause more than wobbles. Retro dressing tables that rock even slightly put stress on their leg joints and can tip forward when you pull a heavy drawer. I have seen original pieces with cracked tenons from decades of this subtle strain.
Felt pads alone rarely solve the problem! They compress unevenly. Instead, check the floor with a spirit level and identify the low point. Thin hardwood shims, cut to fit and stained to match, sit discreetly under the offending foot.
Test the stability with the drawers empty first. Tighten any loose joints before shimming. Then recheck the level after the next seasonal humidity shift, because timber moves.
Once level, the piece moves as one solid unit. The original castors or feet keep their character, and the mirror stays supported even when you lean across the table.
Addressing Scratches and Minor Dents
Even a minor scratch can make a retro dressing table look older than its years, while a shallow dent from a dropped powder jar remains a permanent reminder of a clumsy moment. Before reaching for chemical fillers, try a simple heat trick. Lay a damp cotton cloth over the dent and press with a warm iron. The steam swells the compressed wood fibres back to their original height, often in under a minute. For scratches, mix boiled linseed oil with rottenstone to form a gentle rubbing compound that lifts surface marks without stripping the surrounding finish.
Retro dressing tables with original veneers demand extra patience. Test any treatment on an inconspicuous spot, such as the underside of a drawer, before proceeding. A wax stick matched to the wood tone works well for deeper gouges, but buff thoroughly after application. These small interventions, performed rarely and deliberately, keep the patina intact and preserve the character that makes your piece distinctive.

0 Comments